A coffee maker leaking from the brew basket often has an overflow or drainage problem: water is entering the basket faster than brewed coffee can drain into the carafe. Common causes include a crooked or collapsed filter, too many grounds, coffee that is ground too finely, an incorrectly seated basket, a blocked outlet, or a carafe that is not opening the auto-pause valve. Shut the machine off before checking any parts.
Quick Answer
Turn off and unplug the coffee maker, let it cool, and clean up the spill. Reseat the brew basket, use one correctly sized filter, reduce the coffee dose, and make sure the carafe and lid fully open the auto-pause valve. If parts are cracked, warped, missing, or damaged, replace them with model-compatible parts.
Key Takeaways
- Unplug the coffee maker and let it cool before opening the basket or touching wet components.
- A brew basket overflowing from the top is different from a cracked carafe, overfilled reservoir, condensation drip, or internal housing leak.
- Check the water level, basket, filter, coffee dose, grind size, carafe position, and auto-pause valve before assuming the machine is defective.
- Use only the filter type, carafe, replacement parts, and cleaning procedure specified for your exact model.
- Do not replace missing valve parts with rubber bands, hair ties, wire, tape, glue, or other improvised materials.
At a Glance
| Time Required | About 10–30 minutes for basic cleaning and alignment checks, plus cooling time; a model-specific descaling cycle may take considerably longer |
| Difficulty | Easy for removable-part cleaning and alignment checks; internal leaks require authorized service or replacement |
| Tools Needed | Towels, mild dish soap, soft brush, correct filter, fresh water, and the model’s instruction manual |
| Cost | Cleaning and alignment may require no new purchase; replacement filters, baskets, carafes, lids, and valve assemblies vary by model and availability |
Warning: Do not open the brew basket during or immediately after brewing. Hot water, coffee, grounds, and steam can cause burns. Turn the machine off, unplug it, let it cool completely, and dry the counter before inspecting it. Stop using a machine that leaks from its base, cord area, control panel, plug, or internal housing.
Immediate Solutions for Coffee Maker Leaks

Start by identifying where the liquid first appears. A brew basket that fills and spills over its rim points to an overflow or drainage problem. Water appearing beneath the appliance, around the reservoir seam, or near the cord points to a different and potentially more serious leak.
- Turn off and unplug the machine. Let the basket, grounds, carafe, and warming plate cool completely.
- Remove the filter and wet grounds. Do not restart the machine with a full, backed-up basket.
- Check the reservoir level. Make sure the water does not exceed the model’s MAX line and that a removable reservoir is fully seated.
- Reseat the brew basket. Confirm that it sits level, locks or slides fully into position, and is not warped.
- Inspect the carafe and lid. The correct carafe must sit fully in position, and its lid must contact the auto-pause or drip-stop mechanism as designed.
- Check the filter. Use one filter of the shape and size specified in the model manual. Open a paper filter fully, smooth folded edges, and replace a collapsed or damaged filter.
- Reduce the coffee dose. Excess grounds can restrict drainage and push coffee or grounds over the basket rim.
- Check the grind. Coffee ground too finely can slow flow through the filter. Use the grind recommended for an automatic drip coffee maker unless the manufacturer specifies otherwise.
- Clean the outlet and valve. Remove coffee oils and fine grounds from manufacturer-approved removable parts with warm water, mild dish soap, and a soft brush.
Pro Tip: After cleaning and correct reassembly, a successful manufacturer-approved water-only test points toward the original problem being related to the filter, coffee dose, grind, basket position, carafe position, or grounds buildup rather than an active leak from the appliance housing.

Power your essentials anywhere with a 999Wh pure sine wave power station delivering up to 1000W continuous with 2000W surge. It supports fast charging via USB-C PD 60W and USB-A QC 18W, plus simultaneous output for multiple devices through AC, USB, wireless, and car/DC ports. Recharge using AC, car, or solar with a built-in MPPT controller and dual cooling fans, while the upgraded battery management system protects against surges, short circuits, and overheating.

The coffee machine spring stop kit is located at the bottom of the coffee replacement brewing basket and is suitable for 112435-000-000 185774-000-000 990117900 990237500 and other universal coffee machine models for most coffee baskets.
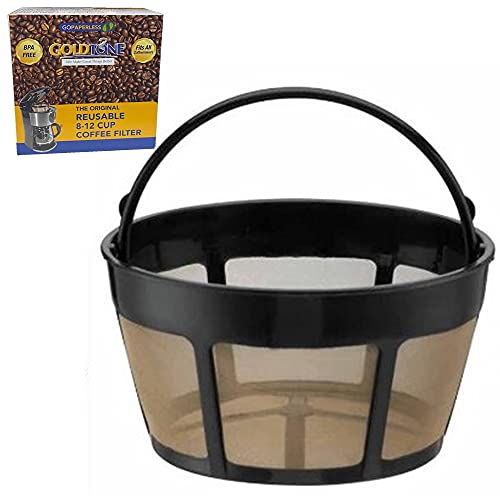
DIMENSIONS - Length(Top): 4.25" , Width(Bottom): 3.25" , Height: 2.25"
Identify Where the Coffee Maker Is Leaking
The location of the first visible water or coffee provides the fastest clue. Dry the outside of the machine and counter first so you can see where new liquid begins. Do not assume every puddle comes from the same problem.
| Where Liquid Appears | Likely Causes | First Check |
|---|---|---|
| Over the top of the brew basket | Too many grounds, fine grind, collapsed or poorly seated filter, blocked outlet, incorrect basket position, or closed auto-pause valve | Filter, grounds, basket seating, carafe, and valve |
| From the basket outlet after removing the carafe | Normal brief dripping or a dirty, damaged, misaligned, or stuck auto-pause valve | Valve movement and sealing surface after the machine cools |
| From the glass carafe | Crack, chip, damaged handle, loose lid, or coffee running down the outside | Dry and inspect the carafe under bright light |
| From the top or rear while filling | Reservoir filled past MAX, water spilled during filling, or removable reservoir not seated correctly | Water level, reservoir position, and dry exterior |
| Around a removable reservoir | Reservoir not seated, damaged seal, crack, overfilling, or debris on the connection | Reservoir fit, fill line, seal, and visible damage |
| A few drops around a lid after brewing | Condensation or a lid that is not fully closed; continuing flow is more consistent with a leak or overflow | Dry the area, close the lid fully, and watch where fresh liquid appears |
| From the base, controls, cord, plug, or underside | Possible internal hose, heater, tank, seal, or electrical-area leak | Stop use and arrange authorized service or replacement |
Check the Reservoir Before Disassembly
Before taking apart the brew basket, verify that the water reservoir itself is not creating the puddle. Do not fill above the MAX mark. If the reservoir is removable, take it out only after the machine is unplugged and cool, then check for cracks, debris around the connection, and a damaged or displaced seal. Reinstall it exactly as the manual shows.
If the exterior was wet from filling, dry the machine and counter completely before diagnosing it. A small amount of condensation near a lid is different from water that continues to appear from a reservoir seam, base, control panel, or electrical area.
Steps to Inspect the Auto-Pause Plunger System
Many drip coffee makers use a movable outlet valve, often called an auto-pause, drip-stop, or plunger mechanism. On designs that use this system, the carafe or its lid opens the outlet while the carafe is installed. Removing the carafe allows the outlet to close temporarily.
The design is not identical on every machine. Some baskets use a plunger, spring, seal, washer, retaining clip, or molded valve assembly, while others use a different non-serviceable mechanism. Consult the manual for your exact model before removing retained components.
Locate All Components
Once the machine is unplugged and cool, remove the basket only if the manufacturer identifies it as removable. Work over a towel or shallow tray and inspect the outlet area for:
- Coffee grounds or oily residue around the valve opening or sealing surface
- A seal that is twisted, cracked, hardened, or visibly out of position
- A movable plunger or valve that sticks instead of moving smoothly
- A loose original spring, clip, washer, or retainer, if the model uses one
- A warped or cracked basket around the outlet
If you disassembled the basket previously, check the sink strainer, dishwasher rack, utensil basket, drying mat, and surrounding counter for small original parts. Compare every part with the model manual or a confirmed model-compatible replacement basket rather than guessing how the assembly fits together.
Safe Reassembly Steps
- Wash only manufacturer-approved removable parts with warm water and mild dish soap.
- Rinse away all soap, coffee oils, and loose grounds.
- Reinstall the original seal, valve, spring, retainer, or other removable component only in the arrangement shown in the model manual.
- Confirm that any user-accessible valve moves freely and returns to its normal position.
- Install the basket and place the correct carafe and lid beneath it.
- Follow the model manual for a water-only cleansing or test cycle.
Note: If the manual does not show the valve as a user-removable assembly, do not force it apart. Replace the complete brew basket when an approved replacement exists, or contact the manufacturer for service guidance.
Understanding the Plunger Mechanism

On a coffee maker that uses a carafe-operated auto-pause valve, the valve controls the path between the brew basket and carafe. With the correct carafe installed, its lid or upper surface pushes the valve open so brewed coffee can drain. When the carafe is removed, the valve closes to limit dripping for a short period.
| Possible Component | Typical Function | Possible Problem |
|---|---|---|
| Plunger or valve stem | Opens the basket outlet on designs where the carafe activates the valve | Coffee residue, damage, or incorrect assembly may prevent normal movement |
| Spring | Returns the valve to its resting position on models that use a spring | Missing, bent, corroded, or incorrectly installed |
| Seal or washer | Helps control leakage around the outlet on designs that use one | Cracked, hardened, displaced, or worn |
| Retainer or clip | Keeps removable valve components attached on some baskets | Loose, broken, or lost during cleaning |
Do not assume your coffee maker contains all four parts or that they install in the same order. On some models, individual valve components are not intended to be serviced separately and the complete basket is the smallest replaceable assembly.
If the basket drains normally only when the outlet mechanism is manually opened after the machine has cooled, check whether the correct carafe and lid are fully seated and activating the valve as the manufacturer intended.
Why the Filter Basket Overflows: Filter, Grind, and Coffee Dose
When coffee backs up inside the basket, check the filter and grounds before taking apart the appliance. Water can accumulate when the filter bed, filter position, or basket outlet restricts drainage.
Common Clogging Culprits
- Too fine a grind: Very fine particles can slow flow through a drip filter and contribute to overflow.
- Too much coffee: Excess grounds create a deeper filter bed and can interfere with normal drainage.
- Collapsed paper filter: A folded or collapsed filter may disrupt flow and allow grounds to escape around the filter.
- Paper filter not fully opened: A wall folded inward or grounds trapped between the filter and basket can interfere with proper drainage.
- Wrong filter shape or size: A filter that does not match the basket can fold, bunch, or sit incorrectly.
- Two filters at once: Using a paper filter with a reusable filter can unnecessarily restrict flow unless the manufacturer specifically permits that combination.
- Dirty reusable filter: Coffee oils and fine particles can reduce flow through reusable mesh.
- Blocked basket outlet: Grounds or residue around the drip-stop or auto-pause outlet can interfere with drainage.
For the Mr. Coffee BVMC-PC14 series specifically, the manufacturer calls for one 8–12 cup basket-style paper filter or the compatible reusable coffee filter. It also notes that extra-fine and decaffeinated grounds may leave more sediment and suggests increasing the coarseness when needed. Refer to the official BVMC-PC14 user manual for the complete model-specific instructions.
Preventative Maintenance Tips
- Empty grounds after the basket has cooled.
- Wash the removable basket after each use or at the frequency specified in the manual.
- Rinse reusable filters thoroughly so fine particles do not remain trapped in the mesh.
- Keep accessible showerhead openings and the basket outlet free of coffee residue.
- Do not exceed the coffee-measuring guidance in the model manual.
- Keep the coffee maker on a hard, flat, level surface.
- Do not fill the reservoir above its MAX mark.
- Use the exact carafe and lid intended for the machine.
Why Using the Right Filter Matters

The best filter is not automatically paper or reusable. It is the filter type, shape, and size approved for the coffee maker’s basket and brewing system.
- Correct shape: Basket-style and cone-style filters are not interchangeable unless the manufacturer expressly permits both.
- Correct capacity: A filter that is too small may fold inward, while an oversized filter may bunch around the basket walls or showerhead.
- One filtering layer: Do not stack paper and reusable filters unless the manufacturer specifically instructs you to do so.
- Secure seating: Open a paper filter fully and position it evenly inside the basket before adding coffee.
- Clear drainage: Clean reusable mesh thoroughly and replace the filter if its frame is warped or its mesh is torn.
If grounds repeatedly escape around a paper filter, make sure the filter is fully opened and remains upright after the basket closes. Fold crimped seams only when the filter manufacturer recommends that method for the filter you are using.
How to Handle Missing Coffee Maker Parts
A missing valve spring, seal, retainer, basket, or carafe lid can prevent a drip-stop system from opening or closing correctly on models that use those components. It can also contribute to an overflow even when the filter and coffee dose are correct.
- Find the complete model number on the appliance label, usually on the bottom or back.
- Open the manufacturer’s instruction-manual directory and confirm the basket, carafe, and valve design.
- Search the manufacturer’s replacement-parts catalog using the complete model number.
- If the exact model or part does not appear in the catalog, contact the manufacturer rather than substituting a similar-looking component.
- Check whether the valve component is available separately or only as part of a complete brew basket.
- Use only a compatible carafe and lid. A similar-looking carafe may sit at a different height and fail to operate the drip-stop mechanism correctly.
- If no approved or confirmed compatible part is available, contact the manufacturer about service options or replace the coffee maker.
For the 14-cup Mr. Coffee model discussed in the original article, the manufacturer’s product listing identifies model BVMC-PC14BL2. Confirm the label on your own appliance because other Mr. Coffee models and revisions may use different baskets, carafes, or service parts.
Effective Cleaning Techniques to Avoid Coffee Maker Leaks
Cleaning the basket and accessible valve area removes coffee oils and grounds that may restrict drainage. Descaling addresses mineral deposits inside the water path, but it will not repair a cracked basket, broken carafe, damaged seal, missing component, or internal housing leak.
Clean the Removable Parts
- Unplug the coffee maker and let it cool completely.
- Remove only the basket, filter, carafe, lid, reservoir, or other parts identified as removable in the model manual.
- Wash manufacturer-approved parts with hot water and mild liquid dish soap.
- Use a soft brush around accessible basket outlets and reusable-filter mesh.
- Rinse thoroughly and let every part dry.
- Reassemble the machine with the basket, carafe lid, carafe, and removable reservoir fully seated.
Use a dishwasher only when the model manual identifies a specific part as dishwasher-safe. The BVMC-PC14 manual permits its brew basket, reusable filter, and carafe on the top rack. The electrical appliance base, power cord, and plug must never be immersed in water or placed in a dishwasher.
Descale According to the Model Manual
Vinegar amounts, cleaning products, cycle lengths, and cleaning schedules differ among coffee makers. Do not assume a one-to-one vinegar mixture or another brand’s cleaning procedure is correct for your machine.
For the Mr. Coffee BVMC-PC14 series, the manual specifies:
- Remove the advanced water-filtration holder and cartridge.
- Add 20 fluid ounces of undiluted white household vinegar.
- Place an empty 8–12 cup basket-style paper filter or compatible reusable filter in the basket and put the empty carafe on the warming plate.
- Activate the machine’s Clean function as directed in the manual.
- Allow approximately 45 minutes for the Clean cycle to complete.
- Discard the vinegar and rinse the carafe.
- Run two complete 14-cup water-only rinse cycles.
- Decalcify at about every 40 brew cycles with hard water or every 80 brew cycles with soft water.
Those quantities, timings, and intervals apply to the BVMC-PC14 series. Follow your own coffee maker’s manual when its instructions differ.
Safe Alternatives to Improvised Spring and Plunger Repairs
Do not use rubber bands, hair ties, glue, wire, tape, or unknown washers as substitutes for original brew-basket components. They are not manufacturer-specified service parts, may interfere with the valve or outlet, and can create a new obstruction or failure.
Safer options include:
- Replacing the complete brew basket with a confirmed model-compatible part
- Replacing the correct valve, spring, seal, or retainer when the manufacturer supplies it as a service part
- Replacing an incompatible, cracked, or damaged carafe and lid
- Contacting the manufacturer for the current compatible part or assembly
- Using authorized service when the leak comes from inside the appliance
- Replacing the machine when a safe compatible repair part is unavailable
Warning: Do not remove the appliance’s outer housing or service cover unless the manufacturer explicitly identifies a user-service procedure. The BVMC-PC14 manual states that there are no user-serviceable parts behind its service cover and that repair should be performed by authorized service personnel. Water around wiring, controls, a damaged cord, or a plug creates an electrical safety concern.
Test the Coffee Maker After Reassembly
A controlled test can show whether cleaning and correct reassembly fixed a basket-drainage problem. Do not run a test if the machine has leaked from its base, controls, cord, plug, internal housing, or another electrical area.
- Place the machine on a dry, hard, flat, level counter near a suitable working outlet.
- Install the empty brew basket correctly without coffee grounds.
- Insert an empty filter only if the model’s cleansing or test instructions require one.
- Place the correct carafe and lid fully in their operating position.
- Fill the reservoir with the amount of fresh water specified for the model’s cleansing or test procedure, staying within all minimum and maximum markings.
- Stand clear of the basket and begin the manufacturer-approved water-only cycle.
- Watch whether water drains into the carafe without backing up inside the brew basket.
- Turn the machine off immediately if water appears from the base, controls, cord, plug, or an unexpected reservoir seam.
For the BVMC-PC14 series, the manufacturer’s first-use cleansing procedure uses fresh water to the MAX fill line and an empty brew basket. Follow the BVMC-PC14 manual rather than substituting a different test volume.
If the water-only test succeeds, brew a small batch using one correctly sized filter and the model-recommended amount of coffee. If fine grounds contributed to the original overflow, try a grind appropriate for automatic drip brewing. Increase the batch size only after the basket drains normally.
When to Repair or Replace Your Coffee Maker
Do not base the decision on age alone. Consider where the leak begins, the condition of the electrical components, availability of manufacturer-approved or confirmed compatible parts, warranty status, and the cost of professional repair compared with replacement.
Repair or Replace a Removable Part When:
- The removable basket is warped, cracked, or missing an original valve component.
- The carafe or lid is cracked, damaged, or incompatible.
- The reusable filter is torn or distorted.
- A manufacturer-approved or confirmed compatible replacement is available.
- The machine passes a manufacturer-approved water-only test after the damaged removable part is replaced.
Stop Using and Replace or Professionally Service the Machine When:
- Water comes from the base, control panel, cord, plug, or internal housing.
- The power cord or plug is damaged.
- The machine trips a breaker, smells burnt, sparks, overheats unexpectedly, or behaves erratically.
- Hot water or steam ejects unexpectedly.
- The housing, internal reservoir, or heater appears cracked or damaged.
- The required safe replacement part is unavailable.
- An authorized repair quote is close enough to the cost of a suitable replacement that repair no longer makes practical sense.
Check the exact model against the U.S. Consumer Product Safety Commission’s coffee-maker recall listings, especially if the appliance unexpectedly releases hot liquid or steam, overheats, or develops an electrical fault.
Frequently Asked Questions
Can a faulty water reservoir cause a coffee maker leak?
Yes. An overfilled reservoir, incomplete seating, debris around a removable connection, damaged seal, or crack can allow water to escape. A reservoir leak generally appears around the reservoir, behind the appliance, or beneath it rather than spilling over the top of the brew basket.
How often should I clean my coffee maker to prevent leaks?
Wash the removable basket, carafe, approved reusable filter, and other manufacturer-approved removable parts as directed by the manual. Descale according to the model’s cleaning indicator or specified schedule. The correct interval depends on the coffee maker, brewing frequency, and water hardness.
What filter is best for preventing brew-basket leaks?
Use the filter shape, size, and type listed in the coffee maker’s manual. Paper and reusable filters can both work correctly when approved for the model. Proper fit, seating, cleanliness, coffee dose, grind size, and clear drainage matter more than choosing paper or reusable solely by preference.
Can a collapsed paper filter make the brew basket overflow?
Yes. A paper filter that folds inward or collapses can interfere with normal flow and allow grounds to escape around the filter. Replace it with a correctly sized filter, open it fully, position it evenly in the basket, and make sure the basket closes without crushing the filter walls.
Are some coffee-maker brands more likely to leak?
A broad brand comparison is not a reliable way to diagnose one machine. Focus on the exact model, leak location, filter and carafe setup, maintenance condition, damaged parts, manufacturer instructions, warranty, replacement-part availability, and recall status.
Can using too much coffee cause the brew basket to overflow?
Yes. Excess grounds create a deeper coffee bed that can restrict drainage and may allow grounds to reach areas where they interfere with normal flow. Discard the wet grounds, clean the basket, replace a damaged paper filter, and restart with the amount recommended in the model manual.
Will descaling fix a coffee maker that overflows from the brew basket?
It can help when mineral buildup is slowing the coffee maker’s water path, but descaling will not fix a collapsed filter, excessive coffee dose, incorrect basket or carafe position, blocked basket outlet, damaged drip-stop component, cracked part, or internal leak. Diagnose the location and basket setup first.
Why does the basket overflow only when the carafe is removed?
On a machine with an auto-pause or drip-stop system, removing the carafe closes or restricts the basket outlet. The feature is intended only for a brief pause. Return the carafe within the maximum time stated by the manufacturer. The Mr. Coffee BVMC-PC14 manual warns that removing its carafe for more than 30 seconds can cause the filter basket to overflow.
Why does the basket fill even though I am not using coffee grounds?
An empty-basket backup points away from the coffee dose itself. Possible causes include an obstructed outlet, a stuck or incorrectly assembled drip-stop mechanism, an incorrectly seated basket, or a carafe or lid that is not activating the outlet correctly. Stop the test, unplug the machine, let it cool, and follow the model manual before continuing.
Conclusion
A coffee maker leaking from the brew basket often has an overflow or drainage problem rather than a sealed-housing leak. Start safely by unplugging the machine, allowing it to cool, drying the area, and identifying where fresh liquid first appears. Then check the reservoir level, filter, coffee dose, grind, basket position, carafe lid, and auto-pause or drip-stop mechanism.
Clean and reassemble only the parts the manufacturer identifies as user-removable. Replace damaged or missing components with model-compatible parts instead of improvising springs, seals, retainers, or other valve pieces. If water reaches the base, controls, cord, plug, or internal housing—or the machine unexpectedly ejects hot liquid or steam—stop using it and arrange authorized service or replacement.
Sources
- Mr. Coffee BVMC-PC14 Series User Manual — safety precautions, filter type, coffee measurements, cleaning procedure, cleaning-cycle timing, and overflow troubleshooting
- Mr. Coffee 14-Cup Programmable Coffee Maker Product Page — model number, features, manual, warranty, and removable-part care
- Mr. Coffee Coffee-Maker Cleaning Guide — general cleaning guidance, vinegar cleaning, rinsing, and electrical-base precautions
- Mr. Coffee Instruction Manuals — model-specific instructions and manual lookup
- Mr. Coffee Replacement Parts — manufacturer replacement-part lookup
- U.S. Consumer Product Safety Commission Coffee-Maker Recalls — current coffee-maker safety recalls and remedies