Using a reusable coffee filter is a simple way to brew with your own ground coffee while reducing your reliance on disposable filters. The key is to match the filter to your exact coffee maker, use a suitable grind and dose, install it correctly, and clean it according to its manufacturer’s directions.
Quick Answer
To use a reusable coffee filter, confirm that it fits your brewer, rinse it, and add medium or medium-coarse ground coffee without passing the fill line. Seat or lock the filter securely, then brew. Let it cool before removing it, discard the grounds, wash it as directed, and dry it completely.
Key Takeaways
- Verify the reusable filter’s model compatibility before placing it in your coffee maker.
- Use medium to medium-coarse coffee as a starting point, unless the filter manual recommends another grind.
- Do not tamp the coffee or fill the filter above its maximum line.
- Make sure a basket filter is seated flat or a refillable capsule is fully closed before brewing.
- Allow the filter to cool, then rinse or wash it after every use and replace it when damaged or permanently clogged.
At a Glance
| Time Required | About 5–10 minutes to prepare and brew, plus 2–3 minutes for cleanup |
| Difficulty | Easy |
| Tools Needed | Compatible coffee maker, reusable filter, ground coffee, fresh water, and a scoop or coffee scale |
| Cost | No disposable-filter cost per brew after purchasing the reusable filter; coffee and water are still required |
Why Choose a Reusable Coffee Filter?

A reusable filter can reduce the number of disposable paper filters or single-use capsules you throw away. The U.S. Environmental Protection Agency identifies reducing and reusing as effective ways to conserve resources and prevent waste.
The actual benefit depends on how long you keep the filter, what it is made from, and how much water and energy you use to clean it. A durable filter that is used regularly and maintained well may replace hundreds of disposable paper filters over its working life.
Reusable mesh filters also change the character of the coffee. They allow natural aromatic coffee oils and very fine particles into the cup, which creates a fuller body and richer mouthfeel. Paper filters absorb most of these oils and trap micro-particles, yielding a lighter, crisper cup with higher visual clarity.
A reusable mesh filter produces a richer, fuller-bodied cup by allowing natural coffee oils through, though a small amount of fine sediment at the bottom of the mug is normal.
From a health perspective, allowing natural oils through also means diterpenes such as cafestol and kahweol pass into your cup. As documented in published research on coffee brews, paper filtration traps most diterpenes, whereas metal mesh does not. For individuals monitoring their LDL cholesterol levels, alternating between paper and mesh filters is a common consideration.

Power your essentials anywhere with a 999Wh pure sine wave power station delivering up to 1000W continuous with 2000W surge. It supports fast charging via USB-C PD 60W and USB-A QC 18W, plus simultaneous output for multiple devices through AC, USB, wireless, and car/DC ports. Recharge using AC, car, or solar with a built-in MPPT controller and dual cooling fans, while the upgraded battery management system protects against surges, short circuits, and overheating.
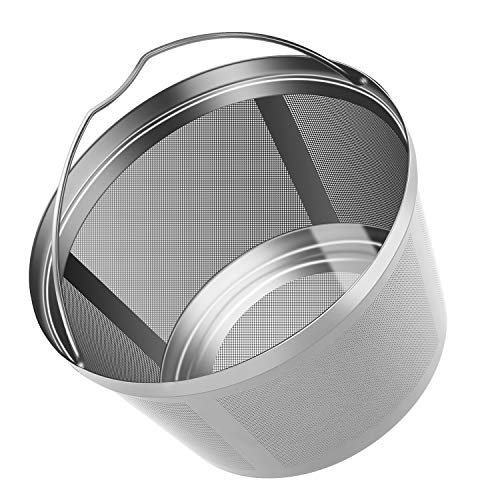
DOUBLE DELICIOUS: Thanks to the fine mesh of the big coffee filter basket, the coffee powder doesn’t flow out. Keeping the original flavor of the coffee and doesn’t remove the aroma of coffee like paper filtration.Made of Food-grade, 18/8 stainless steel and rejects irritating smell that ensure safe.(❌❌❌Don't fit for Hamilton Beach Coffee Maker46310 )
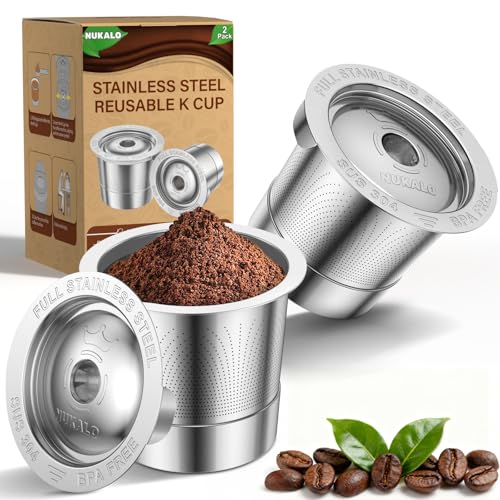
304 Stainless Steel Reusable Coffee Filter:Made from food-grade 304 stainless steel, this reusable k cups for keurig is designed for long-term use and compatibility with K-Cup compatible brewers.
Choose the Right Reusable Filter for Your Coffee Maker
Reusable filters are not one-size-fits-all. Check your coffee maker’s model number, basket dimensions, and the filter manufacturer’s compatibility list before purchasing.
| Filter Type | Common Use | What to Check |
|---|---|---|
| Basket-style mesh filter | Flat-bottom automatic drip coffee makers (8–12 cup) | Basket diameter, wall height, fold-down handle clearance, and drip-stop valve contact |
| Cone-style filter | Cone-basket drip makers and manual pour-over drippers | Standard cone size (#2 or #4), taper angle, rim width, and brewer capacity |
| Refillable single-serve capsule | Pod-style coffee machines (e.g., Keurig, Nespresso) | Brewer series compatibility, puncture needle cutouts, lid seal, and maximum fill line |
| Standalone metal pour-over filter | Manual brewing directly over a mug or carafe | Base stand stability, dual-layer micro-mesh design, and flow rate calibration |
Understanding Filter Materials
- Stainless Steel Mesh: Highly durable, resistant to rust, neutral in taste, and easy to scrub. Dual-layer micro-etched steel filters capture more fine grounds than single-layer wire mesh.
- Gold-Tone Titanium Mesh: Surgical-grade stainless steel coated in titanium nitride (gold-tone). This inert coating prevents metallic flavor transfer and resists corrosion from acidic coffee oils.
- Reusable Cloth (Cotton/Flannel): Traps fine sediment and some oils while eliminating paper waste. However, cloth requires strict sanitation, boiling, and damp storage in the refrigerator or freezer to prevent sour mold growth.
Note: Even filters described as “universal” may exclude specific brewer models. For example, the official Keurig My K-Cup reusable filter features a removable adapter sleeve designed for specific brewer series and is not compatible with K-Mini or commercial K-Cup units.
Never force a reusable filter or capsule into place. An ill-fitting filter can warp the brew basket, bend puncturing needles, crack the lid hinge, or cause hot water and pressurized grounds to spray from the chamber.
Preparing Your Coffee Maker for a Reusable Filter
Before brewing, confirm that the coffee maker and filter are clean, fully dry, and correctly assembled.
- Read the manufacturer guidelines. Confirm the recommended grind size, maximum dry capacity, dishwasher safety, and any adapter requirements.
- Rinse a new filter. Wash a brand-new filter in warm, soapy water and rinse it thoroughly to remove manufacturing dust or packaging residue.
- Clear the brew chamber. Remove any spent grounds, old disposable paper filters, or single-use pods.
- Inspect the drip stop. Ensure the spring-loaded drip-stop valve at the base of the brew basket is free of stray coffee grinds and moves freely.
- Add fresh, cold water. Fill the reservoir with only the amount of filtered water you intend to brew.
- Position the carafe or mug. Center the carafe directly beneath the brew basket outlet to keep the drip valve engaged throughout brewing.
Warning: Do not line a reusable mesh basket with a paper filter unless your machine’s manual explicitly directs you to do so. Layering paper inside a fine mesh screen slows drainage, which can cause the brew basket to back up and overflow boiling water onto your counter.
Filling Your Reusable Coffee Filter With Grounds

Grind size and dose determine whether your coffee brews evenly or backs up in the basket. A medium to medium-coarse grind—resembling sea salt or coarse sand—is the standard baseline for drip machines and refillable capsules.
Never use espresso-fine or Turkish-ground coffee in a standard reusable mesh filter. Fine particles will quickly clog the micro-openings, stall the flow of water, generate heavy sludge in your cup, and risk a severe basket overflow.
For standard drip coffee makers, the general golden ratio recommended by nutrition and culinary standards, including Harvard T.H. Chan School of Public Health, is 1 to 2 tablespoons of ground coffee per 6 ounces of fresh water. Adjust this ratio to your taste preference.
- Observe the Max Fill Line: Single-serve capsules and basket filters have maximum capacity lines. Leave at least 0.25 to 0.5 inches of headspace so the grounds can expand (bloom) when saturated without contacting the showerhead.
- Level the Bed Gently: Shake the filter gently from side to side to distribute the grounds evenly.
- Do Not Tamp: Tamping is strictly for espresso portafilters. Compacting coffee inside a reusable drip or pod filter restricts gravity water flow and causes backpressure leaks.
- Check the Rim: Wipe any stray grounds off the top rim and lid threads before locking to ensure an airtight seal.
Pro Tip: Keep your water volume constant while adjusting your dry coffee dose by half-tablespoon increments. This controlled approach isolates strength from brew ratio, making it easy to dial in your preferred flavor profile.
Placing Your Reusable Filter in the Brew Basket
Proper seating ensures even water extraction and prevents mechanical jams.
Installing a Basket or Cone Filter
- Lower the filter straight into the brew basket without tilting it.
- Ensure the top lip rests flush against the basket rim. A raised edge will prevent the machine’s lid from closing flat and misalign the water showerhead.
- Fold the carrying handle completely flat into its molded recess.
- Verify that the bottom of the basket depresses the brewer’s drip-stop valve properly when the carafe is in place.
Installing a Refillable Single-Serve Filter
- Snap or screw the capsule lid shut until it locks securely.
- Check whether your machine requires removing the standard pod holder (as with many Keurig models using the My K-Cup adapter) or inserting the capsule directly into the existing chamber.
- Align the capsule’s side ribs or bottom puncture-needle cutouts with the corresponding slots in the brew chamber.
- Lower the brewer handle gently. It should shut with smooth, minimal resistance. If you feel hard resistance, stop immediately and check for needle alignment or overfilled grounds.
Let’s Brew: Step-by-Step Instructions

| Step | Action |
|---|---|
| 1 | Inspect the filter. Verify that the mesh is clean, free of torn seams, dry, and correctly fitted to your coffee maker model. |
| 2 | Fill the reservoir. Add fresh, cold water to the reservoir up to your desired cup volume. |
| 3 | Dose and level coffee. Add medium to medium-coarse grounds below the maximum fill line. Level the bed without tamping. |
| 4 | Seat the filter. Place the basket flat in the housing or lock and align your refillable pod in the chamber. |
| 5 | Position the vessel. Place your mug or glass carafe directly beneath the dispenser outlet. |
| 6 | Start the brew cycle. Select your cup size or strength option (e.g., Bold / Strong) and press start. |
| 7 | Cool and clean. Wait 2–3 minutes for steam and boiling water to dissipate, empty the grounds into compost, and wash the mesh. |
Warning: Spent grounds, metal mesh, and escaping steam remain scalding hot immediately following a brew cycle. Allow the machine to sit idle for at least 2 minutes before opening the brew chamber or handling the filter basket.
What to Do If Your Brew Isn’t Right
When switching from disposable paper to a reusable mesh filter, adjustments are normal. Change only one variable at a time (grind size, coffee dose, or water ratio) to systematically identify the issue.
Check Coffee Ground Quality
Fresh whole beans ground just before brewing produce a vibrant, balanced cup. Pre-ground coffee stored in paper bags oxidizes rapidly, leading to flat, sour, or stale flavors.
- Weak or watery brew: Increase the coffee dose slightly or shift to a marginally finer grind, ensuring water flow remains steady.
- Harsh, bitter, or over-extracted flavor: Coarsen your grind size or reduce the dry coffee dose.
- Excessive silt or sludge in the cup: Use a burr grinder rather than a blade grinder to eliminate micro-fines, and verify the mesh screen has no holes.
- Slow drainage or basket pooling: Use a coarser grind and verify that old coffee oils are not clogging the micro-pores.
Adjust Brewing Time and Coffee-to-Water Ratio
Most automatic drip coffee makers run on preset cycle times. You control extraction primarily through grind size and dose:
For single-serve pod machines, brewing a larger cup size (e.g., 10 oz vs. 6 oz) passes more water through the exact same small coffee bed. If your 10 oz setting tastes watery, do not overpack the reusable capsule. Instead, brew two consecutive 5 oz or 6 oz cycles using fresh grounds for each cycle.
Clean the Reusable Filter
Coffee beans contain natural hydrophobic oils. Over time, these oils coat the microscopic mesh openings, polymerize, and turn rancid, causing bitter off-flavors and slow drainage. Regular daily cleaning and periodic deep-cleaning prevent oil buildup.
Troubleshooting Common Reusable-Filter Problems
| Problem | Likely Causes | What to Do |
|---|---|---|
| Weak or watery coffee | Too little coffee, grind too coarse, channelized water flow, or stale beans | Increase dose slightly, grind slightly finer, level the grounds evenly, and use fresh coffee. |
| Bitter or harsh taste | Grind too fine, over-extraction, or rancid polymerized coffee oils on mesh | Coarsen the grind, decrease dose, and deep-clean the filter with hot water and baking soda. |
| Slow draining or overflow | Espresso-fine grind, overfilled chamber, tamped coffee, or paper filter inside mesh | Turn machine off, let cool, switch to medium-coarse grind, never tamp, and remove any paper filter. |
| Heavy sediment in cup | Blade grinder producing excessive dust/fines, torn mesh, or tilted filter rim | Use a burr grinder on medium-coarse, seat the filter completely flat, and inspect mesh for tears. |
| Brewer stops mid-cycle | Capsule overfilled, backpressure trip, or misaligned needle slots | Let cool, dump grounds, refill below max line without packing, and check orientation. |
| Leaking around chamber | Grounds caught in silicone gasket, warped frame, or lid latch not clicked | Wipe rim and seals clean before inserting; replace filter if the plastic frame is warped. |
Enhancing Flavor: Tips for Brewing With a Reusable Filter
A reusable filter lets the full profile of your coffee beans shine through. To maximize cup quality:
- Use a Quality Burr Grinder: Blade grinders smash beans into uneven chunks and micro-dust. A burr grinder creates uniform particle sizes, preventing fines from slipping through the mesh.
- Opt for Medium or Dark Roasts for Body: Reusable filters excel with medium, medium-dark, and dark roasts, where caramelization and natural oils produce a creamy mouthfeel.
- Water Quality Matters: Coffee is 98% water. Use filtered, chlorine-free water with balanced mineral content to enhance clarity.
- Pre-Wet the Basket (Pour-Over): If using a standalone metal cone dripper, run hot water through the empty metal cone into your mug to warm the brewing vessel before adding grounds.
Pro Tip: Weighing your coffee with a digital kitchen scale (aiming for roughly 15 to 16 grams of water for every 1 gram of coffee) is significantly more accurate than volumetric scoops and eliminates brewing inconsistency.
Proper Rinsing and Maintenance of Your Filter
Consistent daily cleaning preserves flow rate, prevents sour oil buildup, and extends the lifespan of your filter.
- Let the filter cool. Allow 2 to 3 minutes for residual steam and hot water to drain before touching the basket.
- Knock out spent grounds. Tap the filter against a compost bin or trash can. Avoid dumping large quantities of coffee grounds into the plumbing to prevent drain clogs.
- Back-rinse the mesh. Invert the filter under warm running tap water. Spray water through the outside of the mesh inward to dislodge trapped grounds from the micro-pores.
- Wash with mild soap. Clean the mesh with warm water, mild dish soap, and a soft nylon brush or nonabrasive sponge. As noted in the Breville Luxe Brewer manual, a soft-bristled brush gently frees oils without deforming the screen.
- Rinse and dry thoroughly. Rinse off all soap residue and allow the filter to air-dry in an upright, well-ventilated dish rack.
Note: Check your manufacturer instructions before using a dishwasher. While many basket filters and the Keurig My K-Cup are top-rack dishwasher safe, high heat on the lower rack near the heating element can warp plastic frames and degrade silicone seals.
Deep Cleaning the Filter Versus Descaling the Coffee Maker
Washing your filter cleans coffee oils from the mesh. Descaling your coffee maker cleans calcium and magnesium scale from the internal boiler pipes. These are separate procedures, as highlighted in Cuisinart’s official cleaning guidelines.
To deep-clean a metal mesh filter that has developed stubborn, sticky oil buildup:
- Submerge the metal mesh filter in a bowl with 1 tablespoon of baking soda and 2 cups of very hot water for 20–30 minutes. Baking soda saponifies and dissolves dried coffee oils without corroding stainless steel or gold coatings.
- Alternatively, soak in a 1:1 mixture of warm water and distilled white vinegar for 20 minutes, then scrub gently with a soft brush and rinse thoroughly.
Warning: Never use steel wool, scouring pads, metal dental picks, or bleach on micro-mesh filters. Abrasive tools tear the delicate wire weave, strip protective gold coatings, and permanently ruin the filter’s sediment filtration.
When to Replace a Reusable Coffee Filter
High-quality stainless steel and gold-tone filters can last for years with proper care. Replace your filter if you observe any of the following signs:
- Torn, frayed, punctured, or separated mesh seams
- Warped frame or capsule body that no longer sits level in the brewer
- Cracked plastic lid, broken hinge, or snapped locking tab
- Hardened, cracked, or missing silicone sealing gaskets causing persistent leaks
- Permanent clogging and water pooling that persists after deep chemical soaks
- Rust spots or peeling surface coatings
Frequently Asked Questions
Can I use any type of coffee grounds with a reusable filter?
Use ground coffee matched to your filter type. Medium to medium-coarse coffee works best in drip filters and refillable capsules. Avoid espresso-fine coffee, as it clogs the mesh, slows drainage, and can cause basket overflows. Do not put instant coffee, cocoa powder, or fine tea dust in reusable pods.
How much coffee should I put in a reusable filter?
For standard drip coffee makers, start with 1 to 2 tablespoons of ground coffee per 6 ounces of water. For refillable single-serve pods, fill to the indicated “Max” fill line (typically 2 to 2.5 tablespoons or 10–12 grams) and leave headroom without tamping down the grounds.
Can I put a paper filter inside a reusable mesh filter?
Only do this if your machine manufacturer explicitly recommends it. In most brewers, placing paper inside a fine metal basket creates excess flow resistance, causing hot water to pool and overflow the brew basket.
How often should I replace my reusable coffee filter?
There is no fixed calendar expiration. Replace your reusable filter when the mesh develops tears, the plastic body warps, the locking tabs break, or persistent flow restriction remains after deep cleaning.
Are reusable coffee filters dishwasher-safe?
Many stainless steel and gold-tone filters are top-rack dishwasher safe. However, check your product manual first. Always keep plastic-framed filters on the top rack away from heating elements to prevent heat warping.
Do reusable filters affect the strength or taste of coffee?
Yes. Metal filters allow natural aromatic oils and micro-particles to pass into the brew, producing a richer, more full-bodied cup with a velvety mouthfeel. Paper filters absorb these oils and yield a crisper, clearer cup with less sediment.
Can I use a reusable filter in any coffee maker model?
No. Reusable filters must match your specific brewer’s basket geometry (cone vs. flat basket) or single-serve pod specifications. Always verify compatibility with your exact brewer model number.
Why are grounds getting through my reusable filter?
A small amount of microscopic silt is natural with metal mesh. However, heavy sediment usually indicates that your grind is too fine, a blade grinder produced excessive coffee dust, the filter was seated unevenly, or the mesh has a puncture.
Sources
- Keurig My K-Cup Universal Reusable Coffee Filter — official compatibility, installation, and cleaning standards
- Breville Luxe Brewer Instruction Manual — mesh filter maintenance, overflow prevention, and grind guidelines
- Cuisinart Coffee Maker Cleaning Guide — separating routine removable component washing from machine descaling
- Harvard T.H. Chan School of Public Health: Coffee — baseline brewing ratios, extraction standards, and storage practices
- U.S. EPA: Reducing and Reusing Basics — waste prevention benefits of reusable filtration products
- Analysis of Cafestol and Kahweol in Coffee Brews — peer-reviewed study on how paper vs. metal mesh filtration impacts diterpene retention
Conclusion
A reusable coffee filter is an economical and environmentally friendly tool that produces a rich, full-bodied cup of coffee. Achieving consistent results comes down to matching the filter to your brewer model, using a consistent medium to medium-coarse grind, respecting maximum fill lines, and never tamping down the grounds.
After brewing, always give the basket a few minutes to cool before handling. Back-rinse the mesh daily under warm running water, deep-clean periodically with baking soda to dissolve polymerized oils, and replace the filter if the mesh frays, the frame warps, or seals fail.